Amplify Pixel and Google Tag Manager Engagement Tracking

Like every other performance marketer, Google Tag Manager is my “right-hand man”.
Don’t get me wrong; I have developers on my team. But in the end, it’s a matter of available time and resources. Like me, learning to master Google Tag Manager (GTM) can help you jump two levels in performance and optimization. But it gets even better…
The developers at GTM recently released a few new, cool, out-of-the-box triggers. In the past, we had to ask our developers to write JavaScript calls to API, in order to report video events or work with custom scripts for time on site and scrolling. Now, all are prebuild and available in GTM. In this post, I will show you how to use these new triggers with Outbrain’s Amplify pixel for multi conversion, so it reports back to the Amplify dashboard. This will help give you valuable insight on your campaign traffic, so you can act accordingly.
**If you are new to GTM, we recommend these tutorial videos.
Basic implementation of Outbrain Amplify pixel with GTM
Before we begin, if you haven’t already set up an Outbrain pixel with GTM, I highly recommend starting with this page in our Help Center. Also, in order to perform the tracking with GTM, you’ll need to work with Amplify Multi Conversion and Event-Based. Read all about it here.
All the implementation steps below assume that the Outbrain pixel is installed and can be fired across all your site pages.
Page Engagement
One of the most important traffic measurements is page engagement. Scrolling, time on site, and visibility are all crucial metrics to understand the traffic you are bringing to your site or landing page. You can always check your GA or other analytic tools, but it’s so much more convenient to see it all directly in the Amplify dashboard.
In order to do this, there are three implementation tactics I’d recommend, but feel free to choose your preferred method. The basic principles are the same. One important thing to remember when setting up conversions in the Amplify dashboard: If you want Event-Based Conversions to appear in the column displaying the total conversions, check Include in Conversions. If you don’t want to include them, uncheck it.
Time on site and clicks conversion point
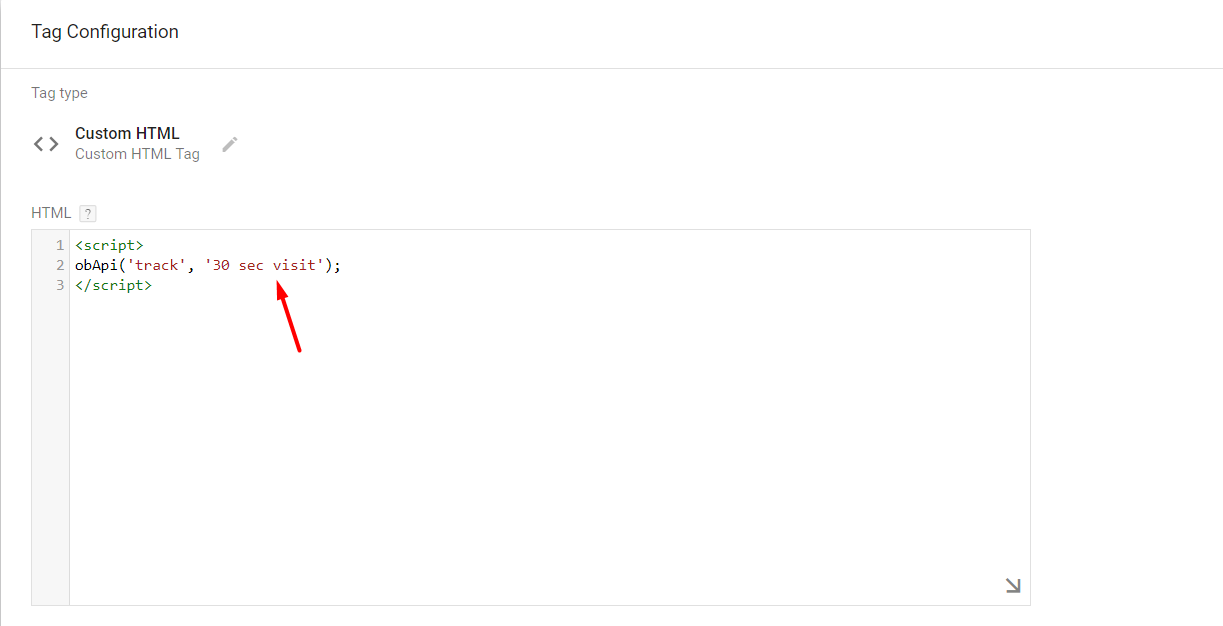
For time on site, we will create a new Event-Based Conversion in the Amplify dashboard and name it “30 sec visit” (you can set the time according to your preference). Then, we will take the tag snippet and add the conversion name. This is how it looks:

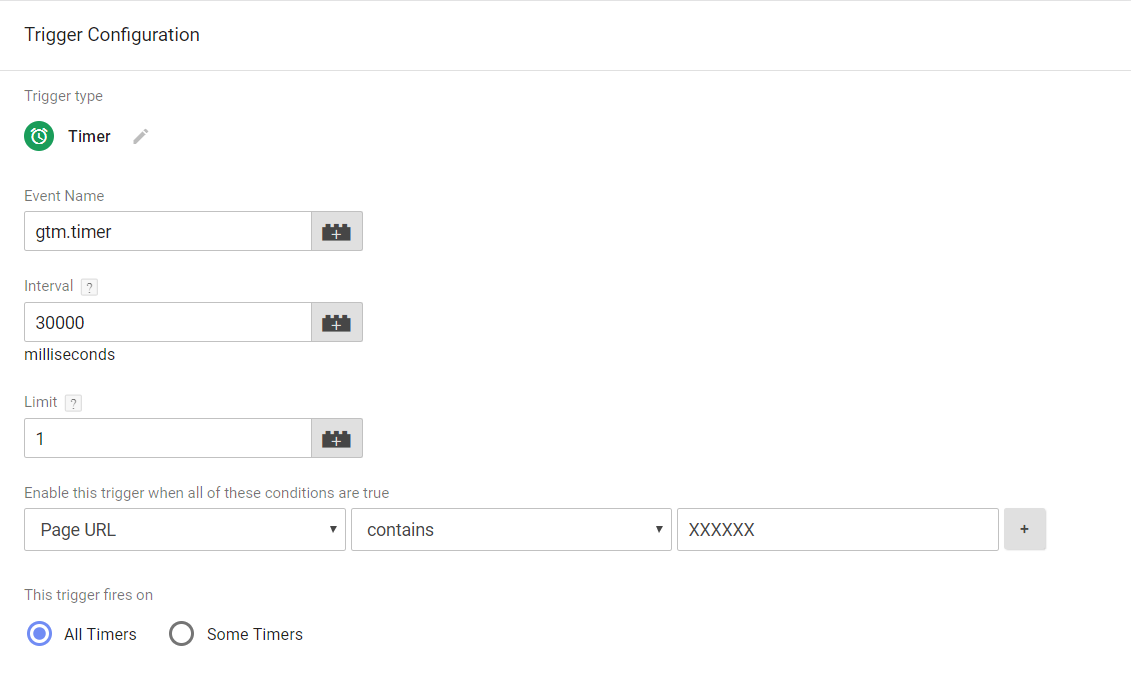
Then, add the timer trigger to the tag:

Clicks conversion point
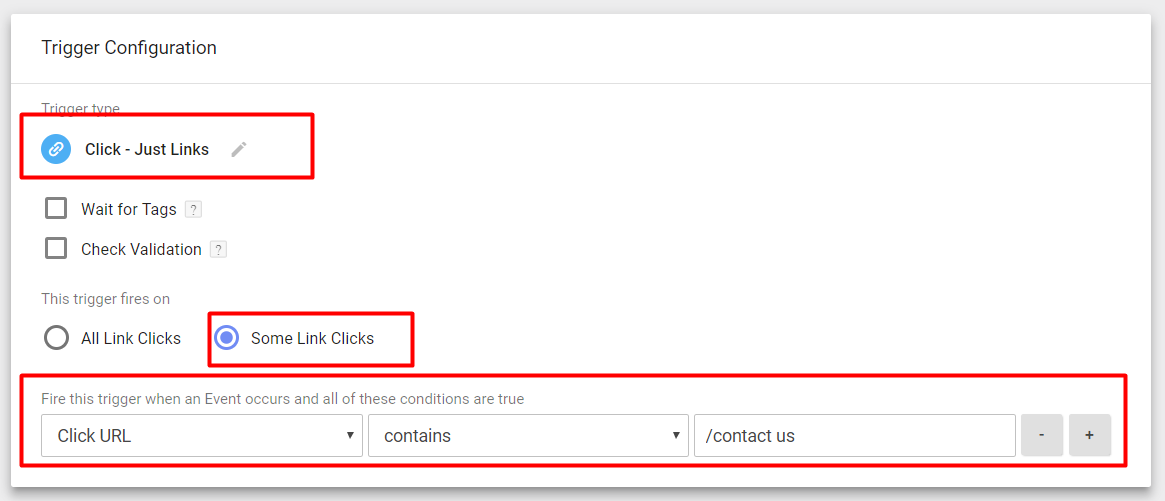
We will create a new Event-Based Conversion in the dashboard and adjust the code snippet accordingly. This time we will use the click trigger, either all elements or just the link, depending on what you want to track. In this example, we’ll use the link click.
If you don’t see this option in your trigger selection, you’ll need to go to >variables>configure> and check it.
In this example, I’ve chosen to trigger an event based on clicks to the Contact Us page from the landing page. The trigger will look like this:

Here are 3 videos that give a great walk-through summary of the entire process:
Visibility conversion point
For visibility conversion point, we’ll use the Element Visibility trigger (this fires the trigger on the gtm.elementVisibility event, when an element becomes visible on the page). Again, if you don’t see it in your out-of-the-box GTM triggers, you’ll need to opt in by checking it in the variables section.
This time, I’m going to track every time a user lands on the landing page, and a section of the landing page is 100% visible to him or her. I have two options here: either to use ID or CSS selector. In this case, I’ve chosen ID selector. The tag should look like this:
<script>
obApi(‘track’, ‘your conversion name goes here’);
</script>
Scrolling conversion point
For scrolling, I’ll use the Scroll Depth trigger (this fires the trigger on the gtm.scrollDepth event, dispatched when the user scrolls the page). I will set my trigger to fire when a user lands on my page and scrolls vertically over 50% of the page.
Video Engagement
If you have a video on your landing page, this section is for you. Before we begin, take note that currently GTM only supports YouTube as a player provider in order to perform the tracking. If you are using other player providers, you will still need to use their API. But there’s good news too. Based on the way the GTM set it up, it’s only a matter of time until we will see other video providers being supported.
If you are not seeing the video trigger in your account, you’ll need to opt-in by checking it in the variable section.
We will use the YouTube Video trigger (this fires the trigger on the gtm.video event, dispatched when a video is viewed on the page). In this example, I want to trigger the event every time a user starts playing my landing page video. Remember, you can adjust the setting to your preferred optimization point, i.e. watch 50%, or complete the whole video.
The trigger will look like this:
Bonus section: Debugging toolkit
Google tag manager injection extension – TMI is a free tool enabling you to inject your GTM container snippet onto any page of any site, without the need for code changes! This will help you debug your GTM tags and triggers before even implementing the GTM code on your site.
Google tag manager preview mode – Every time you change/add a tag/trigger to your container, I highly recommend using the GTM preview mode before submitting your changes to make sure all is working according to your workflow.
Outbrain Pixel tracker – Pixel Tracker for Outbrain pixels. This will help you see the event you are firing and debug your work.
Analytics debugger – This extension loads the debug version of the Google Analytics JavaScript for all sites you browse using Google Chrome. If you are using GTM to send events to GA, this is a very useful way to debug your work. It prints useful information to the JavaScript console. These messages include error messages and warnings that can tell you when your analytics tracking code is set up incorrectly. In addition, it provides a detailed breakdown of each tracking beacon sent to Google Analytics.
Simo Ahava blog – If you want to read more use cases of GTM, understand it better, or just stay up to date, I highly recommend Simo’s blog.
Whew! You’ve made it this far! If you still have questions or need any help setting up your triggers, write in the comments and I’ll be happy to help!


